|
|

|
|
|
Navigation |
|
>> Home |
Displaying Event Log Entries the ASP.NET Way
Written by: Christoph Wille
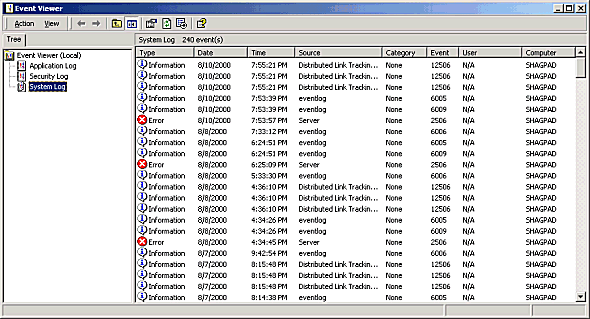
<Advertorial> Under Windows 2000 (or NT) the Event Log is about the most important source of information for the administrator because all events that occurred are logged there - from success to catastrophical failure. And as it is so important, what would be more obvious than to make it accessible via the web? The Event Viewer should be familiar to nearly everyone (see picture). In this article I will demonstrate how the list of entries can be emulated very elegantly using ASP.NET and the .NET Framework SDK. As an exercise for the reader I will leave the construction of a page for the full details of an entry. 
The use of the source code in this article requires the Microsoft .NET Framework SDK installed on a Webserver. I also presume that the reader is familiar to some degree with the C# programming language. Security notice: this article assumes that you are running the ASP.NET worker process under the SYSTEM account, and not the locked-down ASPNET user account (which is used by default). Please change processModel in machine.config accordingly, or enforce impersonation on the files in question. The Brute Force MethodWhen we have to be quick and dirty, knowledge from the days of ASP can very well be used to generate a list of events (Even with a table, though this example doesn't do that). The name of the program is the name of the game: simple.aspx.
<% @Page Language="C#" %>
<% @Import Namespace="System.Diagnostics" %>
<%
EventLog aLog = new EventLog();
aLog.Log = "System";
aLog.MachineName = "."; // Local machine
string strImage = ""; // Icon for the event
Response.Write("<p>There are " + aLog.Entries.Count +
" entries in the System event log.</p>");
foreach (EventLogEntry entry in aLog.Entries)
{
switch (entry.EntryType)
{
case EventLogEntryType.Warning:
strImage = "warning.png";
break;
case EventLogEntryType.Error:
strImage = "error.png";
break;
default:
strImage = "info.png";
break;
}
Response.Write("<img src=\"" + strImage + "\"> | ");
Response.Write(entry.TimeGenerated.ToString() + " | ");
Response.Write(entry.Source + " | ");
Response.Write(entry.EventID.ToString() + "<br>\r\n");
}
%>
The classes for the Event Log are found in the Namespace System.Diagnostics which is bound in at the beginning of the page. Opening the log is in itself straightforward: create a new EventLog object, specify the Log and the MachineName ("." is the local machine). And we're ready to read from the Event Log. This is done in a foreach loop. To make the listing less unimaginative, I put the correct icon before each entry. By the way, the listing of entries is the reverse of the usual order in the Event Viewer: here, the oldest entries are listed first. More elegant with the DataGridASP.NET comes with many innovations, especially for displaying data. And the good part about that is that the data does not always have to come out of a database. This also is true for the DataGrid Web Control which, as the name says, creates a table (grid) out of the data. The only requirement is that the data source supports the ICollection interface - and the Entries Collection of the EventLog does just that. The following source code (speccolsonly.aspx) shows how simple using the DataGrid is:
<% @Page Language="C#" %>
<% @Import Namespace="System.Diagnostics" %>
<script language="C#" runat="server">
void Page_Load(Object sender, EventArgs e)
{
  EventLog aLog = new EventLog();
  aLog.Log = "System";
  aLog.MachineName = ".";

  LogGrid.DataSource = aLog.Entries;
  LogGrid.DataBind();
}
</script>
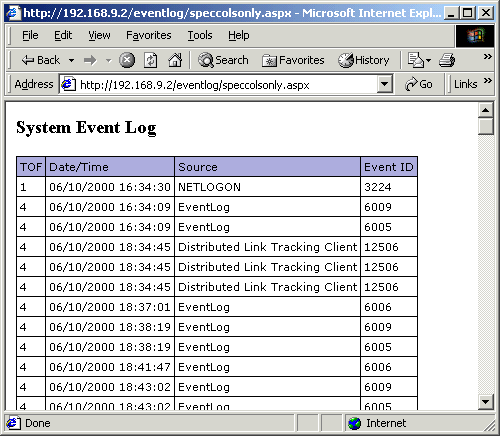
The DataGrid Control (source follows!) only contains formatting instructions, nothing else. The Grid is filled via the Page_Load event, which merely opens the Event Log and then assigns the Entries as the DataSource property of the DataGrid. With the call of DataBind the data is poured into the table - but only the columns we want, as shown in the following screenshot: 
This restriction is being done in the DataGrid tag itself (speccolsonly.aspx contains the entire code):
<form runat="server">
<asp:DataGrid id="LogGrid" runat="server"
    BorderColor="black"
    BorderWidth="1"
    GridLines="Both"
    CellPadding="3"
    CellSpacing="0"
    Font-Name="Verdana"
    Font-Size="8pt"
    HeaderStyle-BackColor="#aaaadd"
    AutoGenerateColumns="false">
    <Columns>
      <asp:BoundColumn HeaderText="TOF" DataField="EntryType" />
      <asp:BoundColumn HeaderText="Date/Time" DataField="TimeGenerated"/>
      <asp:BoundColumn HeaderText="Source" DataField="Source"/>
      <asp:BoundColumn HeaderText="Event ID" DataField="EventID"/>
    </Columns>
</asp:DataGrid>
</form>
The first important step is to set the AutoGenerateColumns attribute to false. This prevents the automatical display of all properties. Now we can specify which columns we want. I am using here four bound columns (bound to the data source).The HeaderText is being displayed in the top row and in DataField the property to be read for filling this column is given. I kept this example with columns intentionally simple. There are many more column types and when you start playing around with the formatting, there are no limits to the designer's 'frenzy'. More than enough examples for this can be found in the QuickStart tutorial.
Paging in the DataGridFor finishing off, I want to use another feature of the DataGrid which is an old acquaintance for DB programmers - paging. The advantage of the DataGrid is that paging needs (almost) no code. This might look like the following:
This time I have again taken the whole source code of paging.aspx into the article for reading through:
<% @Page Language="C#" %>
<% @Import Namespace="System.Diagnostics" %>
<script language="C#" runat="server">
void Page_Load(Object sender, EventArgs e)
{
  BindGrid();
}

void LogGrid_Change(Object sender, DataGridPageChangedEventArgs e)
{
  // Set CurrentPageIndex to the page the user clicked.
  LogGrid.CurrentPageIndex = e.NewPageIndex;

  // Rebind the data.
  BindGrid();
}

void BindGrid()
{
  EventLog aLog = new EventLog();
  aLog.Log = "System";
  aLog.MachineName = ".";

  LogGrid.DataSource = aLog.Entries;
  LogGrid.DataBind();
}
</script>
<body bgcolor="#ffffff">

<h3>System Event Log</h3>

<form runat="server">
<asp:DataGrid id="LogGrid" runat="server"
    AllowPaging="True"
    PageSize="10"
    PagerStyle-Mode="NumericPages"
    PagerStyle-HorizontalAlign="Right"
    PagerStyle-NextPageText="Next"
    PagerStyle-PrevPageText="Prev"
    OnPageIndexChanged="LogGrid_Change"
    BorderColor="black"
    BorderWidth="1"
    GridLines="Both"
    CellPadding="3"
    CellSpacing="0"
    Font-Name="Verdana"
    Font-Size="8pt"
    HeaderStyle-BackColor="#aaaadd"
    AutoGenerateColumns="false">
    <Columns>
      <asp:BoundColumn HeaderText="TOF" DataField="EntryType" />
      <asp:BoundColumn HeaderText="Date/Time" DataField="TimeGenerated"/>
      <asp:BoundColumn HeaderText="Source" DataField="Source"/>
      <asp:BoundColumn HeaderText="Event ID" DataField="EventID"/>
    </Columns>
</asp:DataGrid>
</form>

</body>
</html>
The first changes are found in the DataGrid control: AllowPaging="True" PageSize="10" PagerStyle-Mode="NumericPages" PagerStyle-HorizontalAlign="Right" PagerStyle-NextPageText="Next" PagerStyle-PrevPageText="Prev" OnPageIndexChanged="LogGrid_Change" The two most important attributes are the first and the last one: AllowPaging and OnPageIndexChanged. The first enables paging, the second is the event method triggered upon change of the page. The remaining attributes are of cosmetic nature. As we are working with a collection instead of database supplied data in this example, I made it (almost too) easy for myself: I'm just binding the data onto the grid again. For better performance - especially with databases - the data also should be reloaded in 'snippets'. ConclusionThe actual purpose of today's article was not so much to learn reading the Event Log, but rather to demonstrate how versatile the uses of the DataGrid are outside the main application field of database programming. Very much of the functionality can be used, however, editing of Event Log entries (read-only) doesn't make sense and thus cannot be used. Downloading the CodeClick here to start the download.
©2000-2004 AspHeute.com |